In the digital age, where information is shared and accessed at lightning speed, ensuring the security of sensitive data is paramount. Screenshots have become a common method to capture and share information, but their widespread use also raises concerns about privacy and unauthorized access. To mitigate these risks, various security measures are implemented to disable screenshot functionality in certain scenarios. In this article, we will explore the reasons behind these security measures, discuss how they can be bypassed, and provide practical solutions to enhance your data protection.

Understanding the Need for Screenshot Security
- Safeguarding Confidential Information: One of the primary reasons for implementing screenshot security is to protect sensitive or confidential information from being captured and shared without authorization. Businesses, educational institutions, and individuals often handle sensitive data that must remain private.
- Preventing Unauthorized Distribution: By disabling screenshots, organizations can prevent the unauthorized distribution of copyrighted content, such as movies, TV shows, or proprietary information. This serves to protect intellectual property rights and ensure fair usage policies.
- Protecting Personal Privacy: In certain situations, individuals may want to prevent others from taking screenshots of their personal conversations, photos, or other private content. Enabling screenshot security can help maintain privacy boundaries.
Methods to Disable Screenshot Functionality
Methods to Disable Screenshot Functionality:
Display Overlays:
- Step 1: Identify the sensitive content or information that you want to protect from being captured in screenshots.
- Step 2: Implement an overlay system that will display a semi-transparent layer over the sensitive content.
- Step 3: Ensure that the overlay layer is positioned correctly and covers the entire area of the content you want to protect.
- Step 4: Test the overlay functionality on different devices and screen sizes to ensure it works as intended.
- Step 5: Regularly update and maintain the overlay system to address any potential vulnerabilities or compatibility issues.
Secure Viewing Modes:
- Step 1: Determine the platform or application where you want to disable screenshot functionality.
- Step 2: Explore the settings or options provided by the platform or application to enable secure viewing modes.
- Step 3: Enable the secure viewing mode that specifically disables the ability to take screenshots.
- Step 4: Test the secure viewing mode by attempting to take screenshots to verify its effectiveness.
- Step 5: Educate users or provide clear instructions on how to enable and utilize the secure viewing mode to protect sensitive content.
DRM (Digital Rights Management):
- Step 1: Identify the content or media files that you want to protect using DRM technology.
- Step 2: Choose a DRM solution or service provider that offers the features and capabilities you require.
- Step 3: Integrate the DRM technology into your content or media files, following the provider’s guidelines or documentation.
- Step 4: Configure the DRM settings to disable screenshot functionality for the protected content.
- Step 5: Test the DRM-protected content on various devices and platforms to ensure the screenshot restriction is working effectively.
- Step 6: Regularly update the DRM solution to address any potential vulnerabilities and stay up to date with the latest security measures.
Note: It’s important to remember that while these methods can help deter casual users from taking screenshots, determined individuals may still find ways to bypass these security measures. Therefore, it’s crucial to employ a combination of different security measures and follow best practices to enhance data protection.
Bypassing Screenshot Security Measures (For educational purposes only):
While the intention behind disabling screenshot functionality is to protect sensitive information, it’s important to note that bypassing these security measures may violate legal and ethical boundaries. The following methods are presented for educational purposes only and should not be used for unauthorized activities:
Rooting or Jailbreaking:
- Step 1: Research the process of rooting an Android device or jailbreaking an iOS device.
- Step 2: Understand the risks associated with rooting or jailbreaking, such as voiding warranties, compromising device security, and violating terms of service.
- Step 3: Follow the specific instructions provided by trusted sources to root or jailbreak your device.
- Step 4: Once rooted or jailbroken, explore third-party apps or modifications that may allow you to bypass screenshot restrictions.
- Step 5: Exercise caution as these modifications may introduce security vulnerabilities and could have legal consequences.
Third-Party Apps:
- Step 1: Research third-party apps that claim to bypass screenshot security measures.
- Step 2: Read reviews and feedback from reputable sources to assess the credibility and security of these apps.
- Step 3: Download and install the selected app from a trusted source, following the provided instructions.
- Step 4: Grant any necessary permissions requested by the app, keeping in mind the potential risks associated with extensive permissions.
- Step 5: Test the app by attempting to take screenshots to determine its effectiveness.
Note: It’s important to emphasize that bypassing screenshot security measures without proper authorization is discouraged. These methods are shared for educational purposes only, to highlight potential vulnerabilities, and to promote a better understanding of security systems. Respecting the boundaries of data protection and adhering to legal and ethical guidelines is crucial in maintaining a secure and trustworthy digital environment.
Solutions and Best Practices for Enhanced Data Protection
Be Mindful of Content Sharing:
- Step 1: Assess the sensitivity of the information you plan to share, considering the potential impact if it falls into the wrong hands.
- Step 2: Utilize privacy settings available on the platforms you use to control who can access and interact with your content.
- Step 3: Share sensitive information only with trusted individuals or entities, minimizing the risk of unauthorized distribution.
- Step 4: Regularly review and update your privacy settings as platforms may introduce new features or adjust their settings over time.
Use Secure Communication Channels:
- Step 1: Choose messaging apps or platforms that offer end-to-end encryption to ensure the privacy of your conversations.
- Step 2: Verify the security protocols and encryption standards implemented by the communication channels you use.
- Step 3: Avoid sharing sensitive information over unsecured networks or public Wi-Fi hotspots to prevent interception.
- Step 4: Be cautious when sharing personal or confidential details via email, as emails can be vulnerable to interception or hacking attempts.
Watermark Your Content:
- Step 1: Before sharing visual content that you want to protect, consider adding a visible watermark.
- Step 2: Create a watermark that includes your name, logo, or any other identifying information.
- Step 3: Position the watermark in a way that it cannot be easily cropped or removed from the image.
- Step 4: Use graphics editing software or online tools to add watermarks to your images or videos.
- Step 5: Regularly monitor the usage of your watermarked content to identify any unauthorized distribution and take appropriate action.
Implement Multi-Factor Authentication:
- Step 1: Enable multi-factor authentication (MFA) on platforms or services that support it.
- Step 2: Utilize a combination of factors, such as passwords, biometrics, or security tokens, to verify your identity.
- Step 3: Regularly update your passwords and avoid using easily guessable or commonly used passwords.
- Step 4: Consider using password managers to generate strong, unique passwords for each of your accounts.
Educate Users and Raise Awareness:
- Step 1: Provide clear guidelines and training to users about the importance of data protection.
- Step 2: Promote safe online practices, such as avoiding suspicious links, downloading files from trusted sources, and reporting any security concerns.
- Step 3: Raise awareness about the risks of unauthorized screenshot capture and the potential consequences.
- Step 4: Encourage users to report any incidents or security breaches promptly.
How to Take Screenshots on Different Devices
Taking screenshots has become a common practice for capturing and sharing information across various devices and operating systems. The process may differ depending on the device you are using. Let’s explore the different methods for taking screenshots on Windows, macOS, Android, and iOS devices.
Windows: Using Keybinds and Snipping Tool
To capture a screenshot on a Windows laptop or computer:
- Press the WINDOWS + PRINT SCREEN keys on your keyboard to capture the entire screen.
- Alternatively, you can use the Snipping Tool to manually select the area you want to include in the screenshot.
MacOS: Keybinds for Screenshots
To take a screenshot on macOS or an iMac MacBook:
- Press COMMAND + SHIFT + 3 keys to capture the entire screen.
- If you want to capture a specific area, use COMMAND + SHIFT + 4 and select the desired portion.
Android: Using Gestures and Motions
On an Android device, you can take screenshots using gestures and motions:
- Go to your phone’s settings, tap on System Settings, and then select Screenshot.
- Enable the desired option, such as a 3-finger swipe down or a 3-finger touch and hold, to capture a screenshot with a specific gesture.
iOS: Screen Recording and Control Center
On an iPhone or iPad, you can take screenshots and record your screen:
- To capture a screenshot, simultaneously press the Side (or Power) button and the Volume Up button.
- To record your screen, add the Screen Recording option to your Control Center through Settings. Then, access Control Center and tap the Record button.
It’s worth noting that some applications and platforms may have screenshot restrictions to protect copyrighted content or sensitive information. While screen recording may seem like a workaround, these restrictions often extend to screen recordings as well.
Read more: Secret messaging apps that look like games
Do you know how the screenshot functionality came into existence?
The screenshot functionality has been an integral part of computing since the early days of graphical user interfaces (GUI). The concept of capturing what is displayed on a computer screen dates back to the 1970s.
The first implementation of a screenshot feature was introduced by Xerox Corporation as part of their Alto computer system. The Alto, developed at Xerox’s Palo Alto Research Center (PARC), was one of the first computers to incorporate a GUI. It featured a graphical display and a mouse, which allowed users to interact with on-screen elements.
The screenshot functionality was initially designed as a tool for debugging and development purposes. Programmers and software engineers could take screenshots of the system’s graphical interface to identify issues, document software behavior, and improve user experience.
As personal computers became more prevalent in the 1980s and 1990s, the screenshot functionality evolved to serve various purposes beyond software development. It became a valuable tool for capturing and sharing information, demonstrating software features, troubleshooting, and providing visual documentation.
With the advancement of operating systems and hardware, the methods for taking screenshots have also evolved. Initially, users had to rely on specific key combinations or third-party software to capture screenshots. However, modern operating systems now offer built-in screenshot tools and dedicated keybinds, making the process more accessible and user-friendly.
Today, screenshot functionality is not only a fundamental feature of desktop and laptop computers but also extends to smartphones, tablets, and other digital devices. Screenshots have become an integral part of communication, collaboration, and content creation, serving as visual references for a wide range of purposes.
The evolution of the screenshot functionality showcases its significance in the digital age, enabling users to capture and share visual information with ease. From its early origins as a debugging tool to its widespread use in various industries and everyday life, screenshots continue to play a crucial role in our digital interactions and experiences.
Resolving Screenshot Security Restrictions on Android Devices
Capturing screenshots on Android devices is a convenient way to save and share information. However, certain factors can prevent you from taking screenshots, including browser settings, app security measures, device restrictions, and limited storage space. In this article, we will explore the reasons behind these restrictions and provide solutions to overcome them.
Reason 1: Browser Settings
When using browsers, such as Chrome or Mozilla Firefox, taking screenshots may be restricted, especially when using the browser’s Incognito Mode. This is designed to enhance privacy by preventing any screenshot capture.
Solution: Bypass Browser Restrictions
To overcome this limitation, you can switch to the regular browsing mode or use alternative methods to capture screenshots.
Reason 2: App Security Measures
Certain apps implement screenshot security measures to protect their data from being misused. Developers can use the Android platform’s FLAG_SECURE setting to prevent the app’s content from being captured or recorded.
Solution: Disabling App Screenshot Restrictions
There are methods to disable the FLAG_SECURE setting, such as using the Small Patcher module for Magisk. However, it’s important to note that bypassing app security measures may violate terms of service or compromise data integrity.
Reason 3: Device Restrictions
Some devices may have built-in screenshot restrictions enabled, preventing users from capturing screenshots.
Solution: Adjusting Device Settings
To resolve this issue, navigate to your device’s settings and check for any screenshot-related options. Disable any restrictions or limitations to allow screenshot functionality.
Reason 4: Insufficient Storage Space
If your device has limited storage space available, it may prevent you from capturing screenshots or storing additional images.
Solution: Free Up Storage Space
To address this issue, delete unnecessary files, uninstall unused apps, or transfer files to external storage devices. Clearing up space will allow you to capture screenshots without any storage-related limitations.
By identifying the specific reason behind the screenshot restriction, you can choose the appropriate solution to overcome the issue. Remember to respect app security measures and terms of service while attempting to bypass restrictions. Ensuring sufficient storage space and adjusting device settings will enable you to capture screenshots seamlessly.
How to disable blocked screenshots
In the Chrome browser:
Capturing screenshots can be a handy feature for various purposes, but there are instances where the Chrome browser may block screenshot functionality due to security settings or website restrictions. If you encounter blocked screenshots in the Chrome browser, you can follow the steps below to disable these restrictions.
1: Check Browser Extensions
Browser extensions, such as privacy or security tools, can sometimes interfere with the ability to take screenshots. Disable any extensions that might be causing the issue.
- Click on the three-dot menu icon in the top-right corner of the Chrome browser.
- Select “More Tools” and then choose “Extensions.”
- Disable or remove any extensions that might be affecting screenshot functionality.
2: Use Developer Tools
Chrome’s Developer Tools can be utilized to disable certain elements that prevent screenshots on specific websites.
- Right-click on the webpage where screenshots are blocked.
- Select “Inspect” from the context menu. This will open the Developer Tools panel.
- In the Developer Tools panel, locate and select the “Elements” tab.
- Identify the specific HTML element responsible for blocking screenshots.
- Right-click on the element and choose “Delete Node” or modify its properties to remove the screenshot restriction.
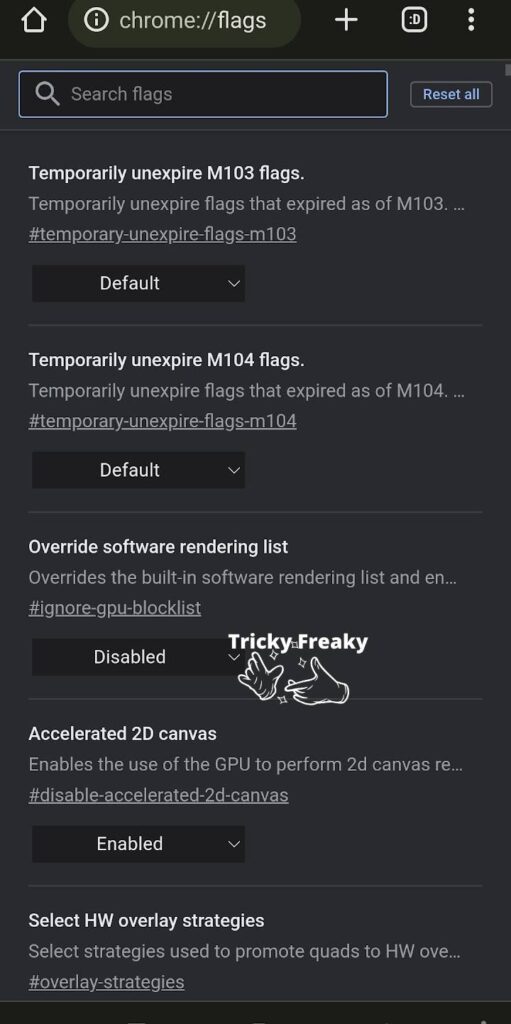
3: Utilize Chrome Flags
Chrome Flags are experimental features that allow you to customize the browser’s behavior. By adjusting certain flags, you may be able to disable screenshot restrictions.

- In the Chrome address bar, enter “chrome://flags” and press Enter.
- Search for “screenshot” or “screen capture” using the search box on the Flags page.
- Disable or modify any flags related to screenshot restrictions. Be cautious when changing flags, as they can impact browser performance or stability.
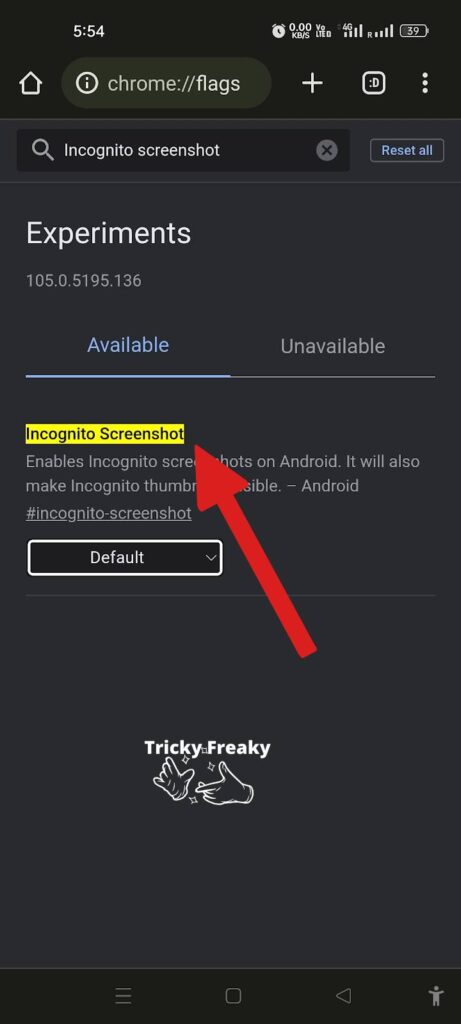
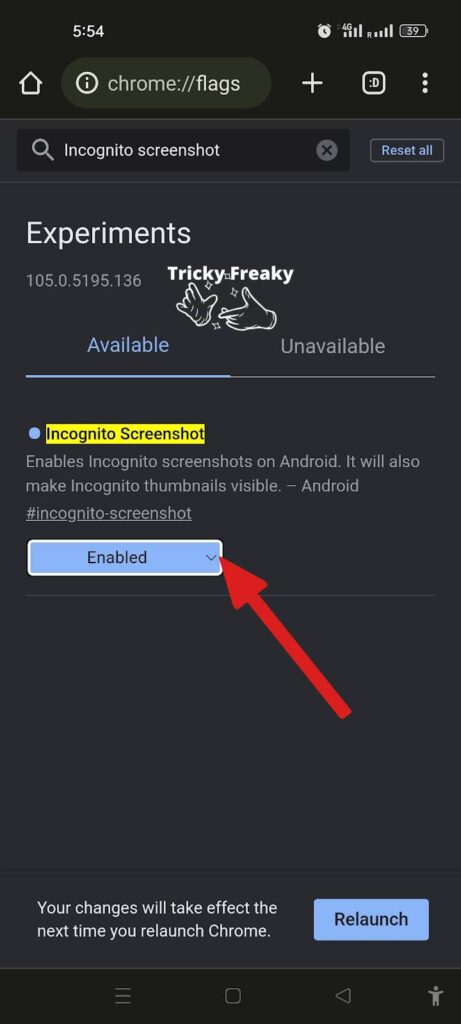
Or you can do:
Lookup for the Incognito Screenshot option.

Choose the “Enabled option” and click on “Relaunch”.

4: Disable Website Restrictions
Some websites implement their own restrictions to prevent screenshots. You can attempt to bypass these restrictions using the following methods:
- Right-click on the webpage where screenshots are blocked.
- Select “Inspect” to open the Developer Tools.
- Navigate to the “Console” tab within the Developer Tools panel.
- Type the following command and press Enter:
document.oncontextmenu = null;- Close the Developer Tools panel and try capturing the screenshot again.
Please note that attempting to bypass website restrictions may infringe upon the website’s terms of service or violate copyright laws. It is important to respect website policies and only capture screenshots within legal and ethical boundaries.
For Firefox:
If you encounter blocked screenshot functionality in the Firefox browser, there are a few methods you can try to disable these restrictions. Follow the steps below to regain the ability to capture screenshots.
1: Disable Website-Specific Restrictions
Some websites may have implemented restrictions to prevent users from taking screenshots. To bypass these restrictions:
- Open the webpage where screenshots are blocked.
- Right-click on the webpage and select “Inspect Element” or “Inspect”.
- In the Developer Tools panel that opens, navigate to the “Console” tab.
- Enter the following command in the console and press Enter:
document.oncontextmenu = null;- Close the Developer Tools panel and attempt to take a screenshot again.
Please note that bypassing website restrictions may violate the website’s terms of service or infringe upon copyright laws. Ensure that you have the necessary permissions to capture screenshots from the website.
2: Use Browser Extensions
Extensions can be useful for modifying browser behavior and functionality. There are certain extensions available that can enable or enhance screenshot capabilities in Firefox. Here’s how to use them:
- Visit the Firefox Add-ons website or the Firefox Extensions store.
- Search for extensions related to screenshot capture, such as “Nimbus Screenshot” or “Lightshot”.
- Install the desired extension by following the instructions provided.
- Once installed, activate the extension and use its features to capture screenshots.
3: Adjust Browser Settings
Firefox provides several settings that can impact screenshot functionality. By modifying these settings, you may be able to disable screenshot restrictions. Follow these steps:
- Open the Firefox browser and type “about:config” in the address bar. Press Enter.
- Accept the warning message that appears.
- In the search bar, enter “screenshot”.
- Look for any related preferences, such as “extensions.screenshots.disabled” or “extensions.screenshots.system-disabled”.
- Double-click on the preference(s) to toggle the value to “false” and disable the screenshot restrictions.
- Restart the Firefox browser to apply the changes.
By following these steps, you can disable blocked screenshot functionality in the Firefox browser. Be aware of the potential limitations or restrictions set by websites and ensure that you comply with their terms of service. Use browser extensions or adjust settings cautiously to enhance your screenshot capabilities.
Resolving Screenshot Restrictions on Devices: Detailed Methods
Capturing screenshots can sometimes be restricted on devices due to privacy, copyright, or security concerns. However, there are methods to overcome these restrictions and regain the ability to capture screenshots. Below are detailed step-by-step instructions for different solutions:
Method 1: Using ADB (Android Debug Bridge)
- Enable Android Debug Bridge (ADB) Debugging on your Android device:
- Go to your device’s Settings.
- Scroll down and tap on “About phone” or “About device.”
- Locate the “Build number” and tap on it multiple times until you see a message confirming that developer options are enabled.
- Go back to the main Settings menu and find the newly unlocked “Developer options” or “Developer settings.”
- Inside the developer options, enable “USB debugging” or “Android debugging.”
- Connect your Android device to a computer:
- Use a USB cable to connect your Android device to a computer with the necessary drivers installed.
- Install and set up ADB on your computer:
- Download the ADB tools package for your operating system (Windows, macOS, or Linux) from the official Android Developers website.
- Extract the downloaded file to a convenient location on your computer.
- Open a command prompt or terminal window in the extracted ADB folder.
- Enable ADB on your Android device:
- On your Android device, a pop-up may appear asking for permission to allow USB debugging. Grant the permission.
- In the command prompt or terminal window on your computer, enter the following command:
adb devices - Verify that your device is listed as a connected device.
Mirror your Android device’s screen on your computer:
In the command prompt or terminal window, enter the following command:
adb shellOnce the shell is active, enter the following command to start screen mirroring:
scrcpyYou should now see your Android device’s screen mirrored on your computer.
- Capture screenshots using your preferred screenshot software:
- Open the screenshot software on your computer (e.g., Snipping Tool, Snagit, or built-in screenshot tools).
- Use the screenshot software to capture screenshots of your Android device’s screen displayed on your computer.
Method 2: Using Third-Party Apps like “Screenshot Touch”
Follow steps:
- Open the Google Play Store on your Android device.
- Search for the “Screenshot Touch” app in the Play Store.
- Tap on the “Install” button to download and install the app on your device.
- Once the installation is complete, open the “Screenshot Touch” app.
- Grant the necessary permissions requested by the app to access your device’s screen.
- Navigate to the app or screen you want to capture a screenshot of.
- Look for the small icon provided by “Screenshot Touch” on your device’s screen.
- Tap on the icon to automatically capture a screenshot of the current screen.
- Access the captured screenshots within the “Screenshot Touch” app or in your device’s gallery.
Method 3: Adjusting Settings
- Open the Settings app on your device.
- Scroll down and find the “Screenshot” or “Advanced” section.
- Look for an option related to screenshot capture, such as “Screenshots” or “Screen capture.”
- Enable the screenshot option if it is currently disabled.
- Check for any additional permissions or settings related to screenshot capture and ensure they are enabled.
Method 4: Utilizing AZ Screen Recorder
Follow steps:
- Visit the Google Play Store on your Android device.
- Search for the “AZ Screen Recorder” app in the Play Store.
- Tap on the “Install” button to download and install the app on your device.
- Once the installation is complete, open the “AZ Screen Recorder” app.
- Grant the necessary permissions requested by the app to access your device’s screen and audio.
- Navigate to the app or screen you want to capture a screenshot of.
- Look for the floating button or toolbar provided by “AZ Screen Recorder” on your device’s screen.
- Tap on the camera icon within the app’s interface.
- Allow the necessary permissions for the app to capture screenshots.
- A screenshot will be taken and saved in your device’s gallery or within the “AZ Screen Recorder” app.
By following these detailed steps, you can overcome screenshot restrictions on your devices and capture screenshots as needed. Remember to respect privacy, copyright, and application terms of service when capturing screenshots.
Conclusion
In conclusion, while it is possible to bypass screenshot security measures, it is essential to approach such actions with caution and adhere to legal and ethical guidelines. Screenshot restrictions are implemented for valid reasons, such as protecting sensitive information, preventing unauthorized use of copyrighted material, and ensuring user privacy.
Respecting these restrictions helps maintain data integrity, safeguard intellectual property, and preserve privacy rights. Engaging in unauthorized screenshot capture can lead to legal consequences and damage to one’s reputation.
Instead, it is recommended to follow alternative methods and solutions outlined in this article. These methods include adjusting device settings, using third-party apps with appropriate permissions, or leveraging screen mirroring options. These options can help capture screenshots without violating security measures or infringing on copyrights.
By prioritizing privacy, respecting intellectual property, and adhering to legal boundaries, users can strike a balance between convenience and data protection. It is crucial to stay informed about evolving technologies and updates to ensure responsible and ethical use of screenshot functionality.
